


REV6 Piston and Ring Installation Guide
Proper piston and ring installation is critical to engine performance and longevity. REV6 pistons are manufactured per OEM specifications and must be installed according to the clearance specifications listed in your machine’s official service manual.
Download the official printable guide here:
Download the REV6 Piston & Ring Installation Guide (PDF)
Important Clearance & Preparation Guidelines
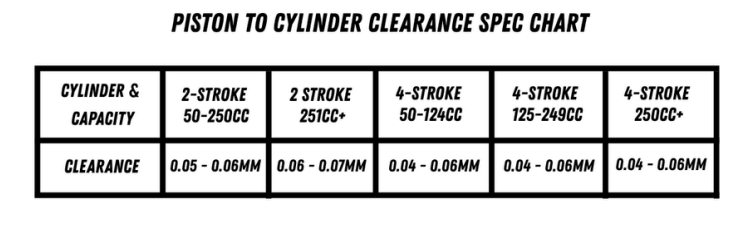
REV6 pistons should be installed to the clearance specifications in the OEM service manual of the given application. Additional bore clearance may be necessary for modified engines.
- Always have the piston available when boring any cylinder, so clearances can be exact.
- Do not have the cylinder bored before purchasing your piston.
- Double-check all clearances before final assembly.
- Always reference the official OEM installation specifications and service manual for your machine.
Clean all parts thoroughly before installation. The cylinder(s) should be cleaned with a quality solvent and wiped with paper towels until the towel comes out completely clean and residue-free. Repeat as necessary to remove debris and oil.
Use high-quality assembly lube when installing engine components.
The clearance chart in the printable guide provides general indications, but always defer to your specific OEM manual.
Ring Installation
2-Stroke Applications
- Markings always face up.
- Top Compression Ring: Thinner, dark gray with silver finish on the outer diameter.
- Second Compression Ring: Thicker black ring.
4-Stroke Applications
- Markings always face up.
- Top Ring: Thinner, dark gray with silver finish on the outer diameter.
- Middle Ring: Thicker black ring (middle compression ring).
- Bottom Ring: Oil control ring made up of one expansion ring and two scraper rings.
Ring End Gap Specifications
REV6 piston rings are pre-gapped and matched for the specific piston and bore size. Filing is typically not required. However, installers must always verify ring end gap.
To measure ring gap:
- Insert the ring into the cylinder.
- Seat it level in the bore.
- Measure with a feeler gauge.
Ring gap should be approximately 0.4% to 0.5% of piston diameter.
- The second compression ring gap should always be larger than the top compression ring gap.
- Dual and single ring gaps typically range from 0.254mm – 0.635mm.
- Oil rings do not need to be checked or modified for gap specifications.
Installing Rings on the Piston
Begin with the oil control ring (4-stroke applications).
- Do NOT spread the ring excessively to fit over the piston — it can break.
- Insert one side of the ring into the groove and carefully work it around into position.
- Repeat for each ring groove until properly seated.
Oil Ring Installation Order:
- Install the expansion ring first.
- Install the two scraper rings.
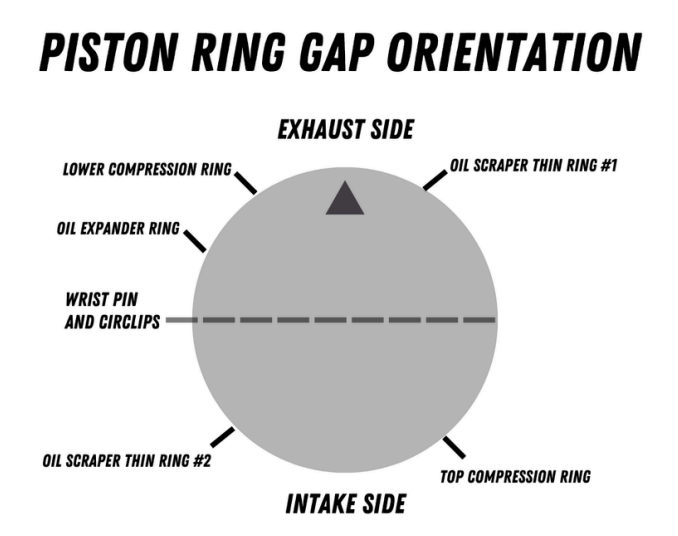
Do not allow expansion ring ends to overlap.
The two scraper rings should be staggered at least 15 degrees (25.4mm) from the expansion ring gap — one gap to the right, one to the left.
Install the lower compression ring (if applicable), then the top compression ring.
Stagger compression ring gaps 180 degrees apart. Avoid positioning ring gaps at the center of the piston on the intake or exhaust side.
Wrist Pin & Circlip Installation
- Install one wrist pin circlip first.
- Lubricate and install the wrist pin through the piston and upper connecting rod.
- Install the second circlip carefully.
Install circlips without bending or distorting them.
REV6 recommends installing wrist pin circlips with the opening positioned at the 6 o’clock or 12 o’clock position.
Additional Resources
Proper piston installation is only one part of a successful engine rebuild. Before the first startup, review our complete engine break-in procedure to ensure correct ring seating.
If you’re preparing for a full rebuild, browse our selection of engine rebuild kits designed specifically for Powersports applications.
You can also explore more technical resources inside our Powersports engine blog for additional build guidance.


